Wednesday, November 23, 2016

Boosting WiFi Signal in your RV

Image result for WiFi symbol Image result for WiFi symbolEvery time we get setup at a campground or RV park that advertises FREE WiFi, I take a look at my iPhone to see what hot spots are available to connect to.  Some campground WiFi's are better than others, and I haven't had a lot of luck in actually getting a good internet connection from the campground WiFi that was better than my iPhone 4G cellular connection.  In some locations, even my 4G cellular signal was so bad I couldn't even make or receive phone calls.  


Most RV'ers in today's digital world have to have some kind of connection to the internet to read the News, check E-mail, pay bills when away from home and sometimes its very handy to look at online maps and find the best route to your next stop and even make reservations online.  With our big Retirement Tour of America trip coming up in the Summer of 2017, I started doing some research (on the internet) about how to get a better WiFi connection when a HotSpot is nearby.  There are a varitey of hardware/software solutions out there when you do a Google search for:  "WiFi Signal Booster". It didn't take long, sifting through all the options and techno jargon, and I was overwhelmed with information overload.

Alfa High Power Desktop WiFi Antenna
Alfa USB WiFi Adapter
After many hours of reading reviews and watching lots of YouTube videos, I decided to search specifically for Boosting WiFi for RV's.  That's when I discovered a YouTube video review of a product called Alfa WiFi Booster that an RV owner purchased and installed for around $100.  Most of the booster systems I had looked at were in the $300+ range.  I continued my research on the Alfa WiFi product and ran across a website called TechnoRV.

Click here to visit TechnoRV.com

This is what I learned by reading the information on their website and watching some of the TechnoRV YouTube videos:

The Alfa USB WiFi Booster shown on the left offers up to a 10x performance increase over your average laptop, tablet or smart phone WiFi connection.  It plugs directly into the USB port of your device and in most cases, automatically installs on your Windows computer and is ready to connect to a nearby WiFi hot spot.
WiFi USB Repeater
Alfa R36 USB WiFi Router/Repeater


By adding the Alfa R36 USB WiFi Router/Repeater and connecting the WiFi Booster above, you can create a private WiFi hot spot right inside your RV, allowing multiple WiFi devices to share the incoming internet connection, just like at home.  This device needs to be plugged in using the provided 110v adapter.

TechnoRV offers several different bundled packages using these devices along with different options for an outdoor omni-directional antenna for a more permanent installation or you can purchase the two devices shown above for a portable solution that can be used anywhere you want to boost a nearby WiFi signal.  If you decide you want to add an outdoor antenna in the future, it can be connected to the Alfa WiFi adapter as well.

I decided to call TechnoRV and ask a few questions about their WiFi Desktop Booster Kit and much to my surprise, a representative answered the phone and connected me with Eric, the owner of the company.  He was very helpful and answered all my questions about this system and sent their Learning Series on how to install and configure the devices for my needs.

I will be installing the Desktop Booster Kit in our RV in the near future, and I will report back here with an update on my experience installing and using it the next time we go camping.

Click here to see the WiFi Desktop Booster Kit on their website

Tuesday, October 11, 2016

VMSpc - Engine Monitoring Update

MONITORING THE DIESEL PUSHER
Silverleaf Electronics VMSpc

(read my tip on installation at the bottom of this article)

The technology built into modern diesel engines these days can provide a wealth of information for the Class A  Motorhomes that were built since the late 1990's.  I became familiar with diesel engines a few years ago when we owned a 47' Mainship Motor Yacht.  A diesel engine is very reliable if you take good care of them, do the scheduled maintenance and exercise them on a regular basis.

When we traded up to a diesel powered Class A, I was already familiar with what makes diesels tick and when I ran across this software: VMSpc that Silverleaf Electronics, I knew how important it was to monitor it's health, especially as we are going down the road.  I downloaded the free software to see what could be displayed and was amazed at how much information was available and how it could be customized.  My delimma was to show the vital information on a laptop screen so I could read it at a glance while driving down the road and not distract my eyes from the road.

I designed my screen on a 15" Gateway laptop that's been sitting in my closet for years collecting dust.  Since I had moved up to Apple OS a few years ago, this laptop was never updated and is still running on MS Windows XP Media Edition (now extinct).  To my surprise, VMSpc installed and ran without a hitch and my evaluation began.  I worked through varoius screen designs, placing gauges and graphs into groupings that were large enough to see from the driver's seat and the laptop sitting on the dash up near the windshield.  That placement seemd optimal with the screen within my view of the road ahead.  At this point I didn't have the required hardware and cables to actually monitor any live data, but I just wanted to see what it looked like out on the road.  I found out one thing immediately, my selection of screen colors was very hard to read against the contrast of the bright view out through the windshield.

When we returned from our short weekend trip, I knew I had to modify the color scheme with a dark background and bright text to compensate for this contrast.  I ended up with a background that's dark grey with bright green labels and engine values, similar to the old CRT displays from the past.


After finding a good combination of background colors and text, I started tweeking my gauges and lining them up into several categories and spaces on the screen with priorties:  Speed, Cruise Set and Gear Selection is what I wanted to stand out.

I created a grouping of engine readings that are critical like: Coolant Temp, Oil Pressure, Manifold Temp, Transmission Temp and Battery/Alternator Voltage. The gauges show actual data digitally, but I wanted to have a quick visual prompt of the status of each gauge, so I added a large idiot light next to each gauge that displays as Green, Yellow or Red depending on what parameters are set for each color.  This is a really quick visual check about the status of the engine while going down the road.

I also defined several gauges in the upper center part of the screen to show Instant and Average MPG's that I could read underway that allows me to adjust my speed for optimum fuel mileage.  One of the gauges allows me to monitor the engine brake retarder to make sure it's functioning.  I normally always have it on in case I have a panic stop situation.


On the far right, I added several Trip and Fuel Tank Status windows for monitoring daily mileage, Average MPG's and Fuel used. I sized them with smaller text and values knowing this information would not need monitoring continuously, but providing reference information to look at when not driving down the road.

After testing this software and designing the screen to my liking, I ordered the required interface box (the JIB), and had it hooked up to the diagnostics port under the dash and everything worked as advertised.  I took it for a short trip out on the highway to make sure everything was functional and made a few adjustments to the layout.  I was itching to try this system out on a real trip, and the opportunity came when Hurricane Mathew threatened South Florida.  Our hurricane preparedness plan was always to drive our RV out of town if we were threatened with hurricane warnings. We have good friends who live in Central Florida, so we loaded up the RV and headed out of town, with the new VMSpc system up and running for a 100 mile trip out of the warning area.  I had to reset the Odometer and Trip windows to get them to record the data properly and I ran a separate odometer app on my iPhone to check the accuracy of the data being generated by the Caterpillar computer.  After the 100 mile run, the RV's odometer compared to the iPhone app's GPS mileage was off by 0.8 miles.  I made the adjustment in the software's Engine Corrections panel, adding a multiplier to adjust the VMSpc Odometer reading.  We were able to return home and were relieved that everything in our area was spared of any damage or flooding that was predicted, but it was sure nice to have the RV in case our home had been damaged without electricity, we would of had the luxury of staying in our motorhome with all the comforts of home.  Since running the 200 mile round trip with live VMSpc data, I tweaked a few more gauges and added a Histogram window do display a graph of each engine gauge displayed in the lower center of the screen.  I haven't had a chance to try out my final screen layout yet, but here's what it looks like with no input.  I hope to do another short highway trip to make sure I have all gauges setup properly.  I'll update with a live screen display later.


Installation Tip:

Instead of powering the VMSpc JIB (interface box) with the 12v power that's provided through the J1939 recepticle and wiring harness that comes with this product, I highly recommend running a separate 12v power wire from another source that's switched with the ignition key.  Otherwise, in most cases, the J1939 plug will provide continuous power to the JIB and it will discharge your main battery over a period of extended storage, even if your motorhome's battery switch is off. 

Wednesday, September 28, 2016

Tail Light Wiring for the HHR in Tow Update

Well, after several troubleshooting sessions at the back of our RV, scratching my head, researching and reading about trailer wiring, towed vehicle wiring, I finally found the solution to the brake light issue on the magnatic tail lights for our HHR when it's being towed behind our Discovery.

It appears that previous owners had different tow vehicles that needed different brake controllers because there are two separate brake controllers mounted on either side of the steering wheel at the driver's console.  Here's what I found and the solution I came up with to get the brake lights to illuminate properly on the magnetic tow lights for the HHR.
  1. There are two receptacles mounted under the back bumper, a 6-pin round and a 7-blade round plug style connector.  Since I don't need 7 wires to

Tuesday, September 13, 2016

Update - Monitoring the Diesel Engine

After several little short trips with the ScanGauge Diesel Engine Monitoring Display installed on the dash, I have decided to upgrade to a hardware/software solution that most diesel pusher RV's are using these days.  Silverleaf Electronics created an interface to the standard J-1939 J-1708 diagnostics port that outputs digital information from most modern diesel engines manufactured since the late 1990's.  Combined with their PC software called VMSpc (Vehicle Management System), anyone can easily design their own instrument panel with a variety of gauges and displays.  To interface the engine/coach information with the software you have to buy a little black box and cabling they call the JIB.  This little magic box interprets the digital information being output by the engine and channels it through a standard USB cable to a Windows laptop or tablet running their software.  Here's a sample screen that's provided with the software:


Here's how I want to display the same info on my laptop.  I saw this layout provided by another RV owner using VMSpc and I liked how he utilized many of the optional features available for each gauge.  Notice that the VMSpc window is shared on the laptop display with mapping/routing software running simultaneously.  I like that idea, but I will probably stick to my iPad running Google Maps for our moving map display and routing instructions.


As soon as I receive the JIB and cabling I will provide an update here and post a screen shot of my final display.

Friday, September 2, 2016

Towing Our Chevy HHR

After considering several options for transportation when we travel in our RV, we finaly decided to tow our 2009 Chevy HHR on all four wheels with a tow bar.  We did consider renting a car once we arrived at our destination but that can get expensive and it's not very convenient. Then I took a look at dolly towing and that's a lot of work driving the car up ramps and strapping the front wheels down on the dolly.  I also thought it would be a royal pain in the arse to rig the car with a tow bar baseplate and hooking everything up, rig tail lights and install a braking system in the HHR.  

After a lot of YouTube research, talking to those whoe tow a vehicle, I finally decided to look for some used equipment and try it out before we head out on our big Trip Across America next year.  I found a used Blue Ox Avanta Tow Bar on Craig's List locally and I was lucky enough to find a baseplate for my HHR out in Nebraska on Craig's List.  I had our local RV dealer install the baseplate last week and we hooked everything up and went out for a test drive.  It was a very simple hookup, quick and easy.  The only thing I'm still looking at is what to do for tail lights and an auxillary brake system.

Here is a photo of our rig all hooked up and ready to go:

Knot At Sea and Dinghy Connected


I decided to try out a wireless tail light system I found at Pep Boys and so far they aren't working properly.  I'm not sure if its the existing plug on the back of my RV or the lights are faulty.  I plan on checking the pins on the plug to make sure I'm getting the right signals to the correct pin-outs.  If I get these things working properly, it's real easy to attach on the back roof of the HHR with the built-in magnets and the LED's run for days on 6 AAA batteries.


  • UPDATE:  It seems that this product is very susceptible to interference.  These wireless lights never functioned with any reliability.  I noticed that when I activate the brake lights, the left one flashes instead of being on steady, and the other one flashes really bright.  There seems to be some kind of interference with the signal reaching from the 7 blade plug/antenna to the back of my towed car.  I returned these lights back to Pep Boys and I plan on installing a permanent wiring harness from the front of the car and connect to the tail lights of my HHR with a diode kit.


The next thing I researched was what kind of auxillary braking system to use.  There are quite a few out there with most of them requiring installation of permanent equipment inside the car.  I didn't really want anything permanent which brought me to the Brake Buddy or the RViBrake that's a completely self contained unit that sits on the floor of the driver's seat with an arm connected to the brake pedal.  The advantage of this is nothing to install and both systems are proportional braking for the towed vehicle.  These systems use high tech inertia modules that sense when you're slowing down and applys the brakes through the arm connected to the pedal with an air cylinder in the unit.  The pressure is maintained by a small compressor that runs on the 12v cigarette lighter.


My RV dealer was kind enough to loan me an older Brake Buddy to try out.  More on this later after I get it hooked up when we leave for our next trip.

Wednesday, August 24, 2016

RV Battery Maintenance and Restoration Techniques - Part 2

So I finally got around to removing the two 12v chassis batteries out of the battery bay and took them home to see how the Epsom Salts treatment might improve their performance.  This whole thing came about because I was having several issues that I didn't know were battery voltage/current related.  After many discussions on several RV Owners Forums online about intermittent A/C shutdowns and slideout malfunctions, I figured I should do a little maintenance on all the battery banks, chassis and house.  I had been seeing several advertisements online about "...never buy another battery again...." and that's when I started a Google and YouTube search for BATTERY RESTORATION. Here is what I have accomplished so far with the two 12v chassis batteries by treating them with Epsom Salts:

In order to see the actual results, I purchased a Digital Battery Analyzer from Harbor Freight that a friend of mine recommended and it just happened to be on sale for $49.95.  The initial test results on both batteries weren't that bad based on the parameters that were in the instruction manual.

The two batteries were manufactured by Duracell and rated at CA(Cranking Amps)=1140 and CCA (Cold Cranking Amps)=950. The date of manufacture is unknown.  Here is the test data before and after treatment:


        Voltage Resistance CCA %Charged
---------------------------------------
Before    12.3    4.5      720     80

After     12.8    3.2      890    100


These results definitely show good improvement after following the treatment process that most YouTube videos recommend, here is a good playlist of videos I used as a guide.


I heated a cup of distilled water and disolved 12 teaspoons of Epsom Salts.  I removed  enough electrolyte from each cell so that I had enough room to add about an ounce of the water/salt solution into each cell, the excess was divided up to top off each cell.  This was repeated for the other battery.  I left the caps loose to allow for venting and hooked up a small battery charger that I also bought from Harbor Freight and set it to 12v/2amp and started the charge on the first battery.  The YouTube videos I watched recommended they be left on charge for at least 24 hours, but the charger showed full charge after a few hours.  The instructions for this charger did indicate that after full charge is reached, the charger still continues to charge the battery and the battery should be monitored for heat buildup.


Both batteries were left on the charger for more than a 24 hour period and left for at least 12 hours before retesting to allow the batteries to normalize after charging.  There is a definite improvement seen and I will be re-installing them back in the coach to see how they perform now.  I will follow up in another six months and report on the performance.

Thursday, August 11, 2016

RV Battery Maintenance and Restoration Techniques - Part 1


I have been reading a lot about battery maintenance lately using several different techniques that are showing up on YouTube and various other media sources. There are 2 different processes, but they both reduce the sulphate buildup on the plates in the battery, which causes all batteries to loose their charging capacity.


1. Add a teaspoon of Epsom Salts to each cell then trickle charge the battery. Take a look at this YouTube link: How to use BatteryChem by Walt Barrett


2. Utilize a smart battery charger that has a desulphating cycle that sends high frequency pulses into the battery that vibrates the sulphate buildup on the plates and returns it back into solution. Look at a product called Battery Minders.


There are quite a lot of articles written lately about the effectiveness of these techniques that backup the claims.  Just do a Google search for Battery Desulphate


Has anyone tried this on their RV batteries? There could be a lot of savings if one was to take the time and give it a try.

Monday, July 18, 2016

RV Parks Near the Beach

Having lived in Florida most of our lives, we have a hard time going anywhere unless its close to a beach.  A little over a year ago we bought our first RV and our search began for RV parks and campgrounds near the beach.  There are only a few scattered around the Sunshine state and I think we have stayed in most of them already, until this weekend. There is a little known secret place in paradise in the Jensen Beach area out on Hutchinson Island where you can rent or own an RV lot, and some of them are waterfront lots.

Beachfront at Shuckers Island Beach Resort and Restaurant
Hutchinson Island is a barrier island on the Atlantic Ocean lying East of Stuart, Jensen Beach and Port St. Lucie that is accessible by two big causeways from the mainland. This stretch of oceanfront is filled with condos and restaurants with access to some of the most beautiful beaches on the East coast of Florida.


South Hutchinson Island
The area along the back side of the island overlooking the Intra Coastal Waterway was developed many years ago with waterfront mobile home parks that have now been converted to ownership communities as modular home condominiums, and some are still occupied with older mobile homes but many of them are being replaced with fancy modular homes while some are converted to RV lots with full hookups.  There are several parks to choose from, Holiday Out, Nettles Island and several other smaller parks that offer rental sites.  These aren't the traditional RV parks everyone is use to finding in a Google search.  You can find them mostly in the real estate listings for sale or rent since these parks are condominium or coop ownership parks.  Here is a site I found that shows some of the available rentals in Venture III:

https://www.vrbo.com/vacation-rentals/usa/florida/central-east/hutchinson-island/venture-3

We are fortunate to have a friend who owns an RV lot in Venture III and he had a vacancy the last 2 weeks in July, so we decided to park our Discovery there and enjoy a couple of extended weekends there.  I drove the RV up from West Palm Friday afternoon and setup on the site.
Dockage for Knot At Sea

We have good friends who live in nearby Stuart, just 15 minutes away and Debbie drove up after work.  We all settled in and went out for a bite to eat at a beachfront restaurant nearby, called Shuckers.  Everything you need is located nearby on the island, from convenience stores, grocery, pubs and lots of public beach access.


More about Venture III, Venture Out and Holiday Out, a combined residential mobile home community, where we were parked.  These sites are only available for monthly or seasonal rental, and not the traditional daily or weekly occupancy found in most RV parks.  So if you're looking for and extended stay near the beach or even a waterfront site to dock your boat right out the back door, I highly recommend this park for anyone who loves the island and beachfront lifestyle.  This community is very friendly, everyone waves as they go by with a nice mixture of young and old.  The community pool is a great place to relax and stay cool in the hot summer months and also meet some of the owners in this community.  Here's an aerial photo of where we are parked, and a few more photos of our first weekend on Hutchinson Island.
Dockage behind our Lot
Tuna Drive - the Street we are on

Several RV Lots looking out over Intracoastal Waterway
The View from Shuckers Beachfront Bar

Friday, July 15, 2016

Update - Monitoring the Diesel Engine with a ScanGauge

My new ScanGauge Advanceed Diesel Engine Monitor and Performance Gauge arrived the other day and I was anxious to hook it up and see what gauges my Caterpillar C7 engine would output. The installation was very simple and straight forward. The J1939 9 pin socket was located just below the instrument panel and to the left of the steering column. After plugging the ScanGauge adapter into the socket, I started the engine and the ScanGauge came to life after a few seconds and I did the setup per the instruction manual and began toggling through all the various gauges that my Caterpillar engine was reporting. Here's a list of what it displayed:

  • Miles Per Gallon
  • Miles Per Hour
  • RPM
  • Throttle Position
  • Coolant Temp
  • Average Fuel Economy
  • Trip Fuel Cost
  • Cost Per Mile
  • Turbo Boost Pressure
  • Battery Voltage
  • Intake Air Temp
  • Transmission Fluid Temp
  • Gallons Per Hour
  • Oil Pressure
  • Engine Loading
  • Horsepower
There are other gauges available, according to ScanGauge if you follow their instructions shipped with the unit.  You have to record the input from your particular engine and write down a bunch of codes and submit them to the ScanGauge technician and they will provide whatever additional info can be programmed into the memory.  I took the time to write down 50+ codes and have submitted them to the company.  We'll see what other info I might be able to monitor.

I found a convenient place to mount the ScanGauge on the Freightliner instrument panel, right below the tach/speedometer.  It's easily visible through the steering wheel and in line of sight of the road ahead while driving so as not be be a distraction.  Here's a couple of pictures:


I took it out for a test drive after it was mounted, and all functions are operating as advertised.  I'm glad to have this information about my diesel engine at my fingertips.  The ScanGauge is much easier than the factory installed engine monitoring system that's so hard to read and complicated to operate.

I would recommend the ScanGauge for anyone who is technically minded and needs to keep track of the health of the engine in their Diesel Pusher.


Monday, July 11, 2016

Our Round Trip Tour of America - Summer 2017

We've been doing some detailed planning for our Summer 2017 Tour of America.  We're planning on leaving right around this time next year.  Debbie and I came up with a list of all the people and places we want to visit, so I did some research online and found a trip planning site that's free and capable of detailed trip information.  For now, we put together a complete round trip online showing dates, times and points of interest on a website called Furkot.com.

Here's a summary of our intended route and highlights on where we plan to visit:

  • Leaving Florida in mid to late July, 2017 on our first destination to visit with my brother in Greenville, SC.
  • Greenville to Allentown, PA via the Blue Ridge Parkway with a stop through Washington, DC.
  • Allentown to the Pocono Mountains for a few days camping
  • Poconos to Duluth, MN to visit friends with a stop in Chicago.
  • Duluth to Rapid City, SD to pick up friends from West Palm Beach, then camping in the Black Hills to see Mount Rushmore and surrounding area.
  • Black Hills to Yellowstone National Park camping and sightseeing.
  • Yellowstone to Helena, MT with West Palm friends to their family ranch.
  • Helena, MT to Seattle area to visit long time Miami friends.
  • Seattle to Portland, OR to visit family.  
  • Portland to Las Vegas, NV with our son/wife via Pacific Coast Highway, San Francisco and sightseeing along the way.
  • Las Vegas to Grand Canyon and surrounding area with daughter and family.
  • Grand Canyon to Denver, CO to visit with friends and family.
  • Denver to Harper, KS to visit with friends and family.
  • Kansas to Florida with various stops along the way to visit friends and family.
Right now, this trip covers more than 10,000 miles and 3 to 4 months out on the road.  We will post a more detailed itinerary as our trip approaches.  Here is an overall view of our proposed route:


Sunday, July 10, 2016

Monitoring the Caterpillar Diesel Engine in our Fleetwood Discovery

With my past experiences in maintaining diesel engines, I realized that the diesel in our motohome needs just as much attention as boat engines do.  I did some research for engine monitoring systems that are designed specifically for motorhomes and there aren't too many choices.  Modern diesel motorhomes are built on a couple of different chassis manufactures that have been around for quite awhile and our Fleetwood Discovery 39S rolls on a Freightliner chassis specifically for recreational vehicles.

Freightliner did a good job configuring the rolling chassis with the very popular Caterpillar 330hp 7 liter turbocharged C7 engine that provides many digital sensors that can be monitored via a standard J1939 plug found under the instrument panel at the drivers seat.  When I did a Google search for what was available for the J1939 interface, there were two products that popped up:


  • SilverLeaf VMSpc that runs on a Microsoft Windows PC system.  There are advantages to this system in that all parameters can be viewed simultaneously and easily customized through the software interface, but it DOES require a laptop or Windows tablet mounted near the drivers seat.  It can get a bit crazy with the wires running to the engine interface plug and various power cords to keep the PC running, but this system is very robust.  The software is free, but you need to purchase the hardware interface that costs $395.


  • ScanGauge, by Linear Logic is a much simpler system that provides the same information about the engine, in a small proprietary display unit that shows various engine data, four readings at a time. This system is a lot less expensive at only $159. 
I decided on the ScanGauge because it is much smaller and much less of a distraction while driving and the price fit my budget.  There is only one wire that provides the data and power and will mount very nicely above the instrument panel of our Discovery, just below and on center with my line of sight looking down the road.

As soon as it arrives and I get it installed, I'll provide a review and report on it's operation.  We're looking forward to a little cooler weather and heading out to our next adventure out on the road, with our new ScanGauge to keep track of our diesel engine performance and health.


Friday, July 8, 2016

Overheating and Radiator Issues - Camping at Jetty Park, Cape Canaveral, FL

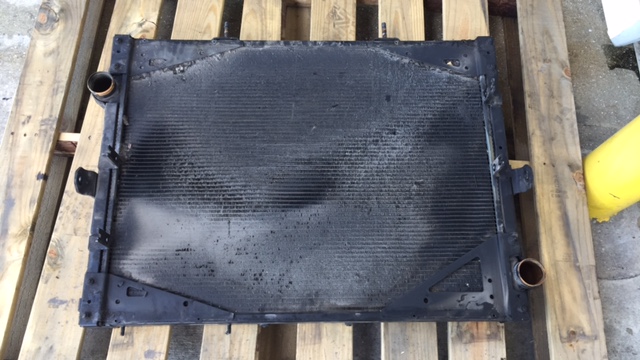
Well, we finally resolved our overheating issues after a week in the shop.  The mechanic spent about 8 hours removing the rear bumper, lots of bolts, the hydraulic tank and shrouding to get the old radiator out, including the after cooler that's sandwiched together right behind the engine driven fan.  What he discovered was a completely clogged radiator and after cooler, that wasn't allowing enough air flow through the cooling fins, causing the coolant temperature to go well above normal operating temperatures.

Here's a few pictures showing the clogged condition:

Radiator and After Cooler Removed

After Cooler

After Cooler

Radiator
The installation of the new radiator went quicker than the removal process and a test drive showed normal coolant temperatures (max 192°) running at 65mph.

So we packed up Friday night and early Saturday morning headed up the coast for a week's stay at Jetty Park located right on the inlet and beach at Port Canaveral.  Everything went well on the 2 1/2 hour drive up I-95 with coolant temps never going above 192°.

This was our first lengthy stay in the Discovery and everything performed flawlessly.  Lots of friends and family coming and going and plenty of beach and pool time to relax and enjoy an old fashioned Florida East Coast vacation.

 Ahhhhh, cool drinks on the beach.  It doesn't get any better than this, huh?

Our campsite nestled in under the seagrape trees. It sure made things cooler in the mid-day sun.
We gathered for all the June Birthdays at a local restaurant located right on the waterfront at Port Canaveral.

One evening, just before sunset, it was a perfect evening for a family portrait on the beach.

Monday, June 20, 2016

More Maintenance Required on a Diesel Pusher

So we traded up to a diesel pusher (DP) knowing it would require more maintenance than a gasser, but didn't know we'd have to put it in the shop as soon as we got it.  A couple of weeks after taking delivery of our (new to us) Fleetwood Discovery, it was time to take her out on the highway and see how it handled and to shake down any issues it might have.

We planned a day trip from the coast out to Okeechobee, about a 100 mile round trip and everything went well.  Love the smooth and quiet ride of a diesel pusher.  However as we were returning and just about back home, a bunch of lights came on and the engine was overheating.  We quickly slowed down and pulled off the highway to take a look under the hood.  The radiator surge tank seemed to be low on coolant and we didn't have any with us to top it off, so we added a little water and the engine cooled down enough to get back on the road.  The temp gauge fluctuated between normal and above normal but didn't overheat again.  Just before arriving back home, we stopped to buy coolant and topped off the surge tank and it seemed to be OK.

A couple of days later, I took the garden hose to the radiator fins and backwashed it, hoping to flush out any dirt or debris.  I wasn't satisfied that this resolved the overheating, so I took a short trip out on the super slab and started monitoring the temp, this time, from the engine info display that reads the actual temperature of the coolant in 1° increments.  Sure enough, after getting up to cruising speed (65mph), the temp started rising from 195° up to 215° at one point.  Everytime I slowed down, the temp would drop down to about 205°, but based on what other Caterpillar owners were telling me, it shouldn't go over 195°.


Instead of any further trial and error guessing on what was causing the overheating, I decided to take it in to a truck repair center and have them run a diagnostic check and see what's up.  After confirming the higher than normal temps and a look-see at the front of the radiator, it was heavily caked with dirt on the engine side, typical of rear radiator mounted coaches.  The repair center also did a pressure check on the radiator and discovered there were several small leaks in the core.  That eliminated the need to try and clean the radiator, and a new one is on order and will be installed this week to get us back on the road.

We're looking forward to our Summer vacation up in Cocoa Beach in our fancy Fleetwood Discovery with friends and family.

More info will be added after the new radiator is installed and we're back up and running.


Thursday, June 2, 2016

We Traded Up

Well, it's been a year since we decided to become RV campers, and we ran across a deal we couldn't refuse.  The RV Center we purchased our Winnebago from found a 2005 Fleetwood Discovery 39S that met our needs for the big retirement trip we have been planning for Summer 2017 and we pulled the trigger and are now the proud new owners of this beautiful coach.  Here is a picture with us setup at a local RV Park for a shakedown of our latest version of Knot At Sea.


We were fortunate to find a site for the three day Memorial Day weekend and everything went as planned.  Everything functioned properly out of all the systems I was familiar with from our previous motorhome, however this newer coach had a few options I wasn't familiar with, but with a little trial and error, I figured them out.

All in all, everything went well and we're looking foward to our next trip up the coast to spend a week at Jetty Park in Caper Canaveral, FL, and continue our Journeys in a Land Yacht.